
FPGA Game Boy Part 2: CPU Scaffolding and test bench
In the last post, I started talking about the internal cycles of the LR35902 CPU. In this post, I’d like to start implementing some instructions. Building a CPU RTL description is a large task, so it’d be crazy to try to implement everything all at once. Instead, I’m thinking of starting with the easy arithmetic instructions and then iterating from there. To make testing quick, I want to use an existing Game Boy assembler, feed the output binary into the test bench’s program memory somehow, and then run that program in the simulator. So first, I’m going to setup a new SpinalHDL project and build the basic instruction fetch state machine. Next, I’ll setup a test bench to visualize what’s happening. Finally, I’ll use the RGBDS assembler to create a program binary and load it into the test bench.
Starting a SpinalHDL project
The SpinalHDL readme links to separate Github project to use as a base for new projects. I already created the SlabBoy repo, so I’m just going to download the zip of the repo and copy the contents into the SlabBoy repo.
The base project has a couple files in it, mostly related to setting up sbt (a Scala build system) for a SpinalHDL project. build.sbt contains the directives to get the right version of Scala and use the latest release versions of SpinalHDL. The project/ directory contains a couple files that specify what version of sbt to use and install the sbt plugin for Eclipse. The src directory contains the folder hierarchy with the actual SpinalHDL code.
Once the base project files are in place, running sbt update in the directory should download and setup all the dependencies necessary to build the project. Of course, that’s assuming Scala and sbt are already installed; if not, head here.
Scaffolding the CPU
The SpinalHDL base project includes two main methods, depending on whether you want Verilog or VHDL output.
//Generate the MyTopLevel's Verilog
object MyTopLevelVerilog {
  def main(args: Array[String]) {
    SpinalVerilog(new MyTopLevel)
  }
}

//Generate the MyTopLevel's VHDL
object MyTopLevelVhdl {
  def main(args: Array[String]) {
    SpinalVhdl(new MyTopLevel)
  }
}
I’m most familiar with Verilog, so I’ll leave just the one main function.
object TopLevelVerilog {
  def main(args: Array[String]) {
    SpinalConfig().generateVerilog(new SlabBoy)
  }
}
Next I’ll add the minimal IO for getting instructions out of the program memory. The mreq output on the CPU mimics the Z80 documentation, just to make things a bit easier when reading the timing diagrams. The top-level SlabBoy component will eventually include other components like the video hardware, VRAM, etc.
class SlabBoy extends Component {
  val io = new Bundle {
    val address = out Bits(16 bits)
    val dataIn = in Bits(8 bits)
    val en = out Bool
  }

  val cpu = new CPU
  io.address := cpu.io.address.asBits
  cpu.dataIn := io.dataIn.asUInt
  io.en := cpu.io.mreq
}

class CPU extends Component {
  val io = new Bundle {
    val address = out UInt(16 bits)
    val dataIn = in UInt(8 bits)
    val mreq = out Bool
  }
}
Referencing the CPU diagram from the previous post, it’s rather straightforward to setup the registers.
object CPU {
  object Reg16 {
    val WZ = 0
    val BC = 1
    val DE = 2
    val HL = 3
    val SP = 4
    val PC = 5
  }

  object Reg8 {
    val W = 0; val Z = 1
    val B = 2; val C = 3
    val D = 4; val E = 5
    val H = 6; val L = 7
    val SPH = 8; val SPL = 9
    val PCL = 10; val PCH = 11
  }
}

class CPU(bootVector: Int, spInit: Int) extends Component {
  import CPU._

...

  // instruction register
  val ir = RegInit(U(0x00, 8 bits))

  // register file
  val registers16 = Vec(Reg(UInt(16 bits)), 6)
  // WZ, BC, DE, and HL are all initialized to zero
  for (i <- (0 until 4)) {
    registers16(i).init(0)
  }
  // SP and PC have defined init values
  registers16(Reg16.SP).init(spInit)
  registers16(Reg16.PC).init(bootVector)

  // 8-bit register vector for easy access
  val registers8 = registers16.flatMap(
    reg16 => Seq(reg16(15 downto 8), reg16(7 downto 0))
  )

...
At this point, using sbt run to run the SpinalHDL compiler, SpinalHDL complains a bit because we aren’t driving the address or enable IOs. So, it’s time to implement instruction fetching. If we look again at the op code and instruction timing chart, all of the instructions seem to have T-Cycle counts that are multiples of four. While the Z80 has some M-Cycles that can have more than four T-Cycles, it looks like the LR35902 uses four T-Cycles for all M-Cycles. This should hopefully make things a bit easier. So, I’ll go ahead and stub out a T-Cycle state machine (SpinalHDL has a great state machine library component).
// first setup a registered address and mreq output
...

  val address = Reg(UInt(16 bits)) init(0)
  val mreq = Reg(Bool) init(False)

...

  io.address := address
  io.mreq := mreq

...

  val tCycleFsm = new StateMachine {
    val t0State: State = new State with EntryPoint {
      whenIsActive {
        address := registers16(Reg16.PC)
        mreq := True
        goto(t1State)
      }
    }
    val t1State = new State {
      whenIsActive {
        mreq := False
        registers16(Reg16.PC) := registers16(Reg16.PC) + 1
        goto(t2State)
      }
    }
    val t2State = new State {
      whenIsActive {
        ir := io.dataIn
        goto(t3State)
      }
    }
    val t3State = new State {
      whenIsActive {
        goto(t0State)
      }
    }
  }

...
This code seems to cause a bit of a problem though when running the SpinalHDL compiler. I got this error, which doesn’t look too good considering it’s just a goto:
[error] ASSIGNMENT OVERLAP completely the previous one of (toplevel/cpu/tCycleFsm_stateNext :  SpinalEnumCraft)
[error]      spinal.lib.fsm.StateMachine.build(StateMachine.scala:170)
[error]     spinal.lib.fsm.StateMachine$$anonfun$2.apply$mcV$sp(StateMachine.scala:209)
[error]     spinal.lib.fsm.StateMachine$$anonfun$2.apply(StateMachine.scala:207)
[error]     spinal.lib.fsm.StateMachine$$anonfun$2.apply(StateMachine.scala:207)
[error]     slabboy.CPU.<init>(SlabBoy.scala:44)
[error]     slabboy.SlabBoy.delayedEndpoint$slabboy$SlabBoy$1(SlabBoy.scala:14)
[error]     slabboy.SlabBoy$delayedInit$body.apply(SlabBoy.scala:7)
[error]     slabboy.SlabBoy.<init>(SlabBoy.scala:7)
[error]     slabboy.TopLevelVerilog$$anonfun$main$1.apply(SlabBoy.scala:109)
[error]     slabboy.TopLevelVerilog$$anonfun$main$1.apply(SlabBoy.scala:109)
[error]     slabboy.TopLevelVerilog$.main(SlabBoy.scala:109)
[error]     slabboy.TopLevelVerilog.main(SlabBoy.scala)
Usually when I run into this kind of thing in SpinalHDL, I head on over to the gitter chat. Dolu1990 is the creator of SpinalHDL, and he is active in the chat answering questions and things. He noticed that this problem is actually a bug in the state machine library, and implemented a fix right away. However, the fix hasn’t been packaged into an official release yet. So, we’ll have to clone the dev branch and build it locally. Luckily, it’s not difficult at all.
git clone https://github.com/SpinalHDL/SpinalHDL.git
git checkout dev
sbt publish-local
Then we just have to make sure that the SlabBoy project is using the same version as the local checkout, instead of the latest published release. That only requires a quick change to the SlabBoy build.sbt.
...

libraryDependencies ++= Seq(
  "com.github.spinalhdl" % "spinalhdl-core_2.11" % "1.1.6",
  "com.github.spinalhdl" % "spinalhdl-lib_2.11" % "1.1.6"
)

...
That’s better:
[info] Running slabboy.TopLevelVerilog
[info] [Runtime] SpinalHDL v1.1.6    git head : 870a05bb2d6d5c5cd4b79d9b57460b1ace68becb
[info] [Runtime] JVM max memory : 5346.0MiB
[info] [Runtime] Current date : 2018.04.11 21:31:26
[info] [Progress] at 0.000 : Elaborate components
[info] [Progress] at 0.148 : Checks and transforms
[info] [Progress] at 0.229 : Generate Verilog
[info] [Progress] at 0.233 :     emit CPU
[info] [Progress] at 0.279 :   emit SlabBoy
[info] [Warning] 20 signals were pruned. You can call printPruned on the backend report to get more informations.
[info] [Info] Number of registers : 36
[info] [Done] at 0.283
[success] Total time: 6 s, completed Apr 11, 2018 9:31:26 PM
Creating the test bench
Now it’s time to create a test bench to feed in some data and make sure it gets into the instruction register. This test bench will also allow us to visualize the execution of instructions as they’re implemented in the CPU. The SpinalHDL template project includes an example test bench that I’ll start from.
object TopLevelSim {
  def main(args: Array[String]) {
    SimConfig.withWave.compile(new SlabBoy).doSim { dut =>
      // perform initial reset and generate a clock signal
      dut.clockDomain.forkStimulus(period = 2)

      // create a concurrent thread to handle the memory accesses
      // separate from the main test bench execution
      val memThread = fork {
        var i = 0
        while (true) {
          dut.clockDomain.waitRisingEdgeWhere(dut.io.en.toBoolean == true)
          // just some dummy data for now
          dut.io.dataIn #= i % 256
          i += 1
        }
      }

      sleep(100)
    }
  }
}
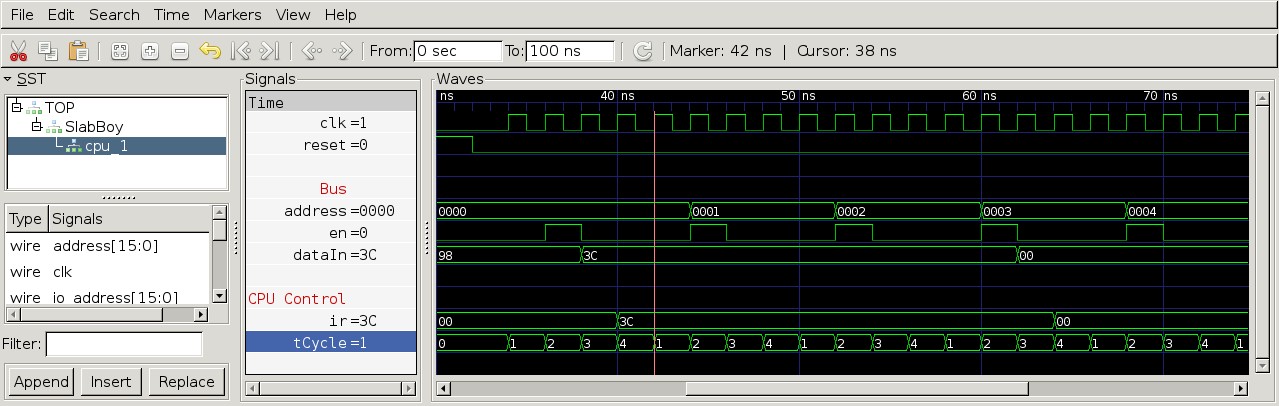
Running the test bench requires Verilator to be installed. Then, actually running the test bench is pretty easy: sbt runMain slabboy.TopLevelSim. Once the simulation is done, GTKWave can open the output waveform, simWorkspace/SlabBoy/test.vcd, created by the simulation run. It looks like the basic test bench is working!

Assembling a program
Now the basic SlabBoy test bench works, but the data is just a dummy counter. I’d like the data to come from an actual assembled program. To do this, I’m going to use the RGBDS tool-chain to assemble and link a simple test program. In fact, this test program is so simple it only has one instruction for now: inc a. First, let’s create test.asm:
SECTION "ROM0", ROM0

inc a
inc a
inc a
Then, assemble and link it:
rgbasm -o test.o test.asm
rgblink -o test.gb test.o
Then to verify, I’ll open up test.gb in a hex editor.
00000000: 3c3c 3c00 0000 0000 0000 0000 0000 0000  <<<.............
00000010: 0000 0000 0000 0000 0000 0000 0000 0000  ................
00000020: 0000 0000 0000 0000 0000 0000 0000 0000  ................

...
Cross-referencing the Game Boy op code chart… yep, 3C is the op code for inc a.
I don’t like re-running commands manually like that over-and-over, so I’ll create a quick makefile to automate building the program binary.
all: test.gb

clean:
	rm -f *.gb

%.gb : %.o
	rgblink -o $@ $<

%.o : %.asm
	rgbasm -o $@ $<
Now, we just need to modify the test bench to load the program from the test.gb binary file.
object TopLevelSim {
  def loadProgram(name: String): Array[Byte] = {
    Files.readAllBytes(Paths.get(name))
  }

  def main(args: Array[String]) {
    SimConfig.withWave.compile(new SlabBoy).doSim { dut =>
      dut.clockDomain.forkStimulus(period = 2)

      val memThread = fork {
        val memory = loadProgram("sw/test.gb")
        while (true) {
          dut.clockDomain.waitRisingEdgeWhere(dut.io.en.toBoolean == true)
          val address = dut.io.address.toInt
          dut.io.dataIn #= memory(address)
        }
      }

      sleep(100)
    }
  }
}
And…the waveform output looks good! The 3C instruction (inc a) is fetched from memory three times, matching the assembled program.
Cool. I’m pretty happy with that for now. In the next post I’ll start implementing some of the instruction decode logic.